Design Pattern Adapter: Understanding with real examples.
Each pattern describes a problem which occurs over and over again in our environment... - Erich Gamm
When we are developing software, we' re solving problems. This is the big goal. But problems also arise that we need to solve to keep the software moving forward. Let's see in this article how to use the adapter design pattern to solve problems between incompatible classes. Let's start with a brief explanation of the pattern.
Adapter
First I need to warn you that we will only have examples of the adapter in its classic structure, which uses composition instead of inheritance. If you want to understand in more depth the differences between the object adapter and class adapter that uses inheritance, I recommend you read this article. I think it is more valid to show the implementation that is the most adherent to various programming languages.
Now is good to remember that this is a structural pattern consisting of 4 classes in its context:
- Target: Defines the interface of the specific domain that the client uses.
- Adapter: Adapts the original class (Adaptee) to the interface of the Target class.
- Adaptee: The Class that needs to be adapted.
- Client: The Client, collaborates with the Target interface.
The name is well suited for its purpose, this is a pattern that I consider very important to understand deeply, because its use helps a lot to solve problems between coupling between classes in our work. Let's see the description of this pattern:
The adapter pattern converts the interface of a class into another interface clients expect. Adapter lets classes work together that couldn't otherwise because of incompatible interfaces.
Ok it is an objective description. But let's understand it better.
The adapter convert the interface of a class into another interface
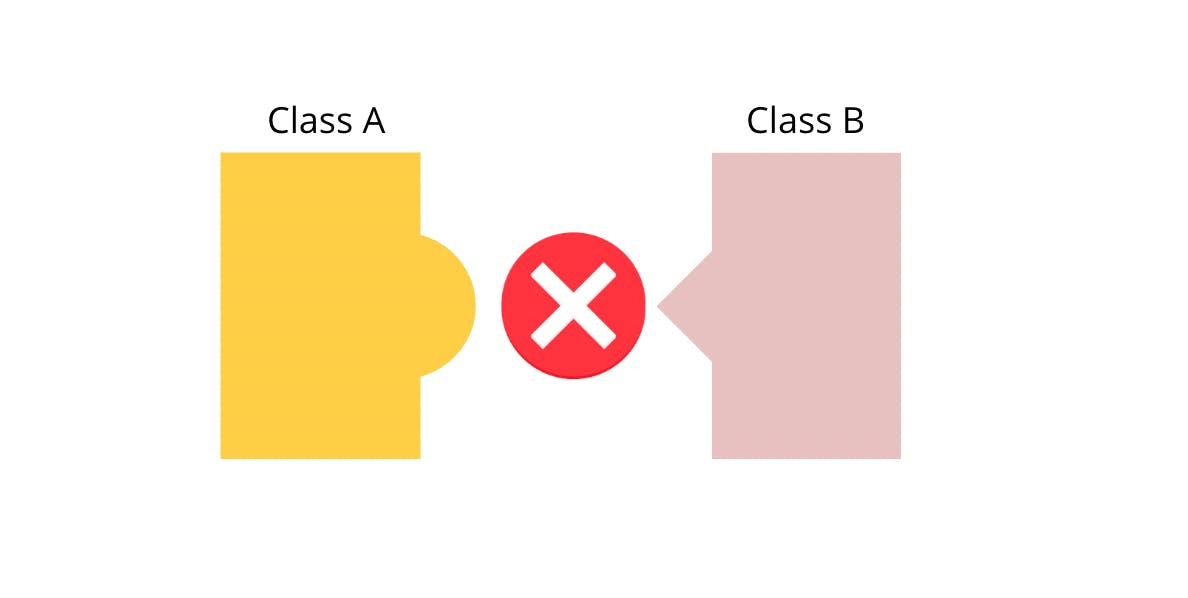
What would be converting an interface into another interface? We can illustrate, see the image below:

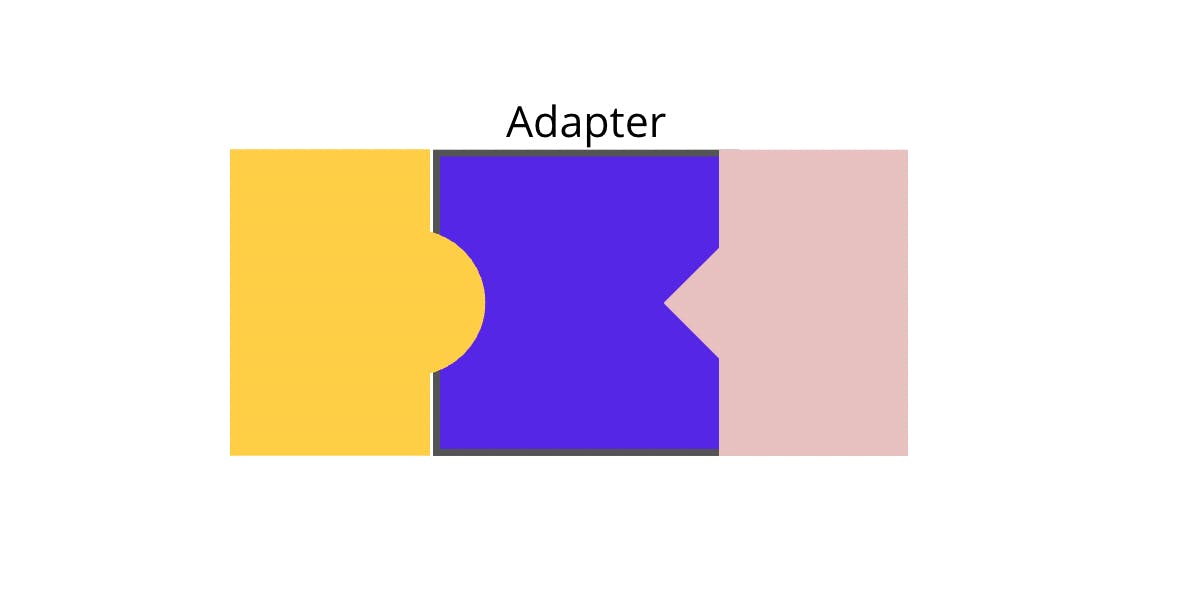
The two interfaces need to be compatible, but obviously it won't be possible, they don't satisfy each other's form. We need interface B to be compatible with interface A. How do we solve this problem? We need an adapter. A class that can convert what we need from one interface to the other. See now how it looks with an adapter acting in our illustration:

And that piece in the middle that represents the adapter allows classes work together that could not otherwise work together because of incompatible interfaces.
Adapter in practice
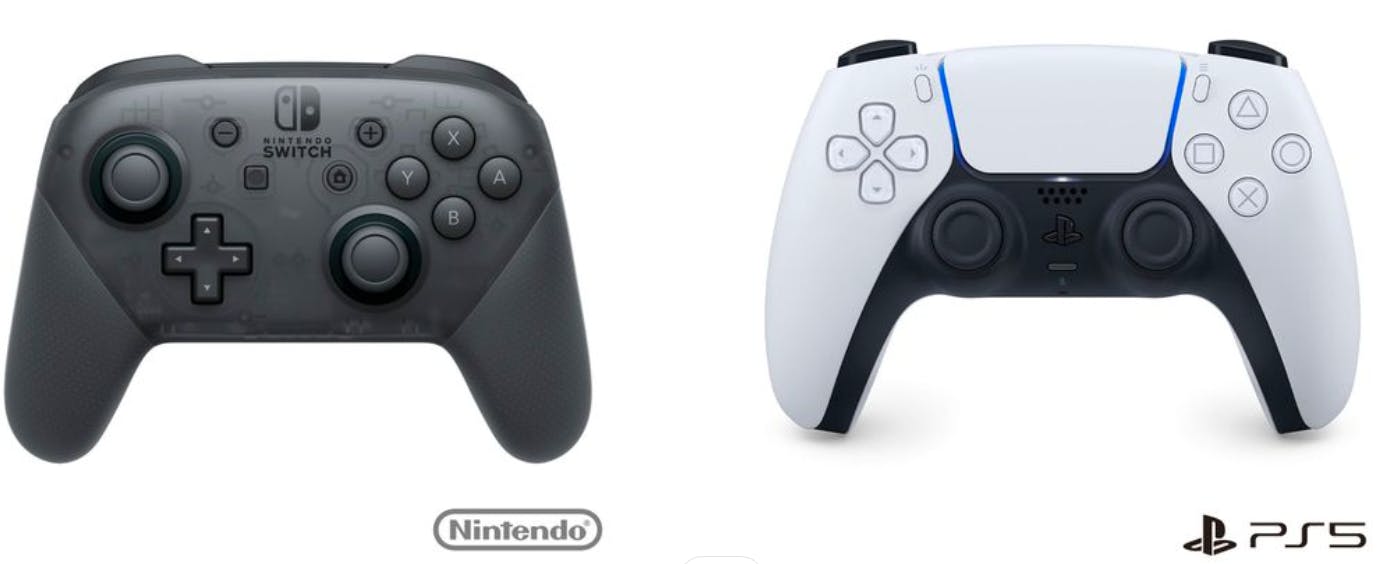
Let's imagine that you were hired by Nintendo to meet a very specific demand, they need PS5 players to be able to use the Nintendo Switch Pro controller to play games. Why? Nintendo was acquired by Sony.
Right, we know that they are different platforms, so we have a nintendo controller that can not adapt to the playstation console because it is incompatible. After all we can not directly change the control of a Nintendo, it would generate more work. But the two controls have some features in common. The controls have directionals, triggers and buttons that perform actions. But there is no Playstation driver that accepts the inputs from a Nintendo control:

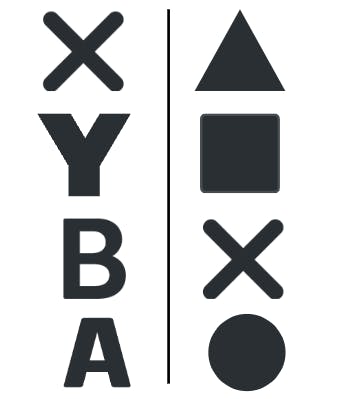
The standard adapter can solve this problem. We have a class that needs to be integrated into the system, and we can't change it directly. So we can create an adapter that will do this conversion. So when the user clicks on the X button on the switch pro, the adapter will convert to the triangle button on the Playstation and so on:

Now let's get our hands on the code.
Adapting the classes
Continuing with the example of the control we need to adapt, we will have three class that already exist, the PlaystationDriver, NintendoDriver and NintendoController:
class PlaystationDriver {

    logged(): void {
        console.log(`New Joystick was logged`);
    }

    inputButton(button: string) {
        console.log(`${button} was pressed!`)
    }

}

class NintendoDriver {

    logged(): void {
        console.log(`New Joystick was logged`);
    }

    inputButton(button: string) {
        console.log(`${button} was pressed!`)
    }

}

class NintendoController {

    constructor(private readonly nintendoDriver: NintendoDriver) { }

    logged(): void {
        this.nintendoDriver.logged()
    }

    pressedX(): void {
        this.nintendoDriver.inputButton('X')
    }

    pressedY(): void {
        this.nintendoDriver.inputButton('Y')
    }

    pressedB(): void {
        this.nintendoDriver.inputButton('B')
    }

    pressedA(): void {
        this.nintendoDriver.inputButton('A')
    }

}
The NintendoController class expects in its constructor a NintendoDriver to connect, but we need it to connect to a Playstation sensor. Without an adapter to convert the logic it is not possible to use a Nintendo Switch Pro controller on a Playstation.
class NintendoToPlaystationAdapter {
  constructor (private readonly playstationDriver: PlaystationDriver) { }

  logged (): void {
    this.playstationDriver.logged()
  }

  inputButton (input: string) {
    input = this.convert(input)
    this.playstationDriver.inputButton(input)
  }

  private convert (nintendoInput: string): string {
    const nintendoInputs: Record<string, string> = {
      X: 'triangle',
      A: 'circle',
      Y: 'square',
      B: 'cross'
    }

    return nintendoInputs[nintendoInput]
  }
}
So now we have a class that receives the commands from a Nintendo controller and adapts the commands to what a Playstation driver recognizes:
const adaptee: PlaystationDriver = new PlaystationDriver()
const adapter: NintendoToPlaystationAdapter = new NintendoToPlaystationAdapter(adaptee)
const targetController: NintendoController = new NintendoController(adapter)

targetController.logged()
targetController.pressedX()
targetController.pressedB()
targetController.pressedX()
targetController.pressedY()
In the code above we have the adaptee which is a Playstation driver, we have our adapter and we have our target which is a nintendo control.
The Nintendo joystick is being adapted to connect to a Playstation driver.
The adapter converts every button pressed by the Nintendo joystick to a button that the Playstation driver recognizes, thus allowing the two previously incompatible classes to now understand each other.
This shows us how useful the adapter design pattern can be. Let's look at another, much more real-world example.
Functions Example
The example code below shows an online shopping cart in which a shipping object is used to calculate shipping costs. The old Shipping object is replaced by a new and improved Shipping object that is more secure and offers better prices.
The new object is named AdvancedShipping and has a very different interface that the client program does not expect. ShippingAdapter allow the client program to continue running without any API changes by mapping (adapting) the old Shippinginterface to the new AdvancedShippinginterface.
// old interface

function Shipping() {
    this.request = function (zipStart, zipEnd, weight) {
        // ...
        return "$49.75";
    }
}

// new interface

function AdvancedShipping() {
    this.login = function (credentials) { /* ... */ };
    this.setStart = function (start) { /* ... */ };
    this.setDestination = function (destination) { /* ... */ };
    this.calculate = function (weight) { return "$39.50"; };
}
The above code clearly shows that the parameters are not compatible and therefore we need an adapter to solve this problem:
// adapter interface

function ShippingAdapter(credentials) {
    var shipping = new AdvancedShipping();

    shipping.login(credentials);

    return {
        request: function (zipStart, zipEnd, weight) {
            shipping.setStart(zipStart);
            shipping.setDestination(zipEnd);
            return shipping.calculate(weight);
        }
    };
}
See that we are assigning in the request the old attributes and adapting them to the new attributes that the function that returns a lower price expects to receive, so the class understands its role of adapting the attributes, you can see that the code will not break:
function run() {

    var shipping = new Shipping();
    var credentials = { token: "30a8-6ee1" };
    var adapter = new ShippingAdapter(credentials);

    // original shipping object and interface

    var cost = shipping.request("78701", "10010", "2 lbs");
    console.log("Old cost: " + cost);

    // new shipping object with adapted interface

    cost = adapter.request("78701", "10010", "2 lbs");

    console.log("New cost: " + cost);
}
All the code here can be tested in typescriptlang.org and playcode.io.
Adapter in third-party integrations
The example we are going to see is in java, but see how the pattern is useful for solving problems related to incompatible API integrations.
Let's imagine that your responsibility is to call an API from an external system to calculate tax. The server would expect information such as zip code, product, price, among others to calculate the tax. The problem is that this API expects the data in XML format. Internal APIs expect JSON as input and return JSON as output. Now if we want to make a call to the external server, we have to convert the JSON data to XML format.
The adapter pattern can help us. First we need to define an interface with a method signature in it:
interface IDataAdapter {
    Xml convert(Json json);
}
Now since we want to convert the JSON data to XML, the JSON data will be our adaptor and this class will contain methods for converting the JSON data to other formats. For our use case, it contains only one method to convert the data to XML format.
class Json {
    public Json(){}
    Xml convertToXML(){
      //  Logic to convert the data into Xml
    }
}
Now we have to implement, that is, we are fulfilling the contract defined by the IDataAdapter interface:
class JsonToXmlAdapter implements IDataAdapter {
    // It contains an instance of an Adaptee
    private Json json;
    public JsonToXmlAdapter(Json json){
        this.json = json;
    }

    public Xml convert(Json json){
        // Convert Json to Xml
        this.json.convertToXML()
    }
}
See that we have the JSON instance, which would be our adaptee, and this allows us to convert to the format that the external API expects to receive. You can test it:
Json json = new Json("some json data");
IDataAdapter adapter = new JsonToXmlAdapter(json);
Xml xml = adapater.convert()
// Call the calculate tax API using the XML data
Decimal tax = calculateTax(xml);
Conclusion
The adapter pattern works as an intermediary between two interfaces with incompatible interfaces. It adds functionality missing in an adapter class that can encapsulate objects to make them compatible with the target interface.
I hope you liked what was explained and that everything was clear. If you have any questions or suggestions, please contact me!